WS_FTP instructions
The first time you use WS_FTP to connect to your site you will have to create a login file. A window will automatically appear when the program is opened. If you don't see this window, click on "connect".
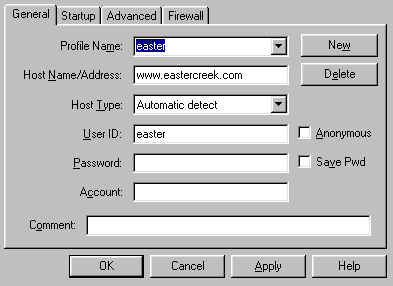
1.Click on New
Host Type - Automatic detect
2.Profile Name - Use a name that will help you to identify with the domain that you are accessing. Like "Easter"
3.Host Name/Address - www.domainname.com ( your domain name )
4.User ID - Your username : AAAAA ( or whatever it
is)
Password: xxxxxx ( or what ever it is)
Account - There is no need to use this.
Checkmark "save password" if you wish WS_FTP to remember your password.
Do NOT check the anonymous box
Click Finish.
5.
I'm connected, now what?
Once you have connected, you will see that WS_FTP has divided into two frames (if you
are using the classic view). The left hand frame is a directory map of your
"local" computer (the one you are sitting at right now). WS_FTP calls this your
Local System. The right hand frame is a directory map of your remote server (your
domain). WS_FTP calls this your Remote Site. In this right hand frame you will see the
name of the directory you are in. It should read "/". Do not upload your files
in this directory.

To get to the directory that you need to be at in order to upload your files, double click
on the little icon next to "public_html" on the right hand side. Then up in the
top right hand corner in that white box under where it says "Remote Site" you
should see something like /yourdomain/public_htmlat is the place you need to
be for your files to show up in the browser for your visitors.
IMPORTANT- ONLY WORK WITH
THE public_html folder!!! If you put your files ANYWHERE else
noone will be able to see them!

If possible don't mess with the other folders here, except if you want to start moving your picture files to the images folder. The other folders are just system stuff.
Transferring files over
Now you are ready to begin moving your files onto your server. There are two methods of
file transfer:
ASCII - Used with text based files (.html, .htm, .txt, .pl, .cgi, etc.).
(note - never ever upload .cgi and .pl
files in binary)
Binary - For binary based files only (.jpg, .gif, .exe, .doc, .avi,
etc).
If you are moving over an entire folder of information, instead of one file at a time,
then you can select the AUTO check box.
Click the file (or folder) that you want to upload on the left hand
side so that it is highlighted.
Click the arrow that points right in the middle of the screen to move it to the right side
It will then upload your file and the right side will refresh and display the newly
uploaded file.
